Sunday, June 30, 2013

Bloglovn' Mini Tutorial for Adding Widgets to Your Blog

It looks like there were a few of you who found the tutorial for claiming your blog on Bloglovin' helpful.  I'm glad I was able to help those of you who still hadn't made the move to get your blogroll set up.  Well, now I am here to hopefully assist those of you who are unsure how to proceed for adding the Bloglovin' widgets such as the 'follow me' and 'total number following' buttons.  One of my friends needed a hand and since I created the tutorial for her, I figured the least I could do is share it with any of you having difficulties with this process.

In order to add the widgets to your blog, you will need to make sure that you have signed in to Blogger and pull your blog up as well, as you will need to go back and forth between Blogger and Bloglovin'.
  1. Open up a new window in your Internet browser.
  2. Go to Bloglovin'.  Click HERE for a shortcut to get there.
  3. When you get to Bloglovin' sign in.
  4. Hover your mouse over the white heart contained within the blue box (unless you've uploaded your picture which will take the place of the heart).
  5. Scroll down and choose 'Bloglovin' Button'.  This will bring you to the page with all the button choices.
    .
  6. Choose the one you want from the 'Bloglovin' Buttons' options and click on 'Get this icon'.
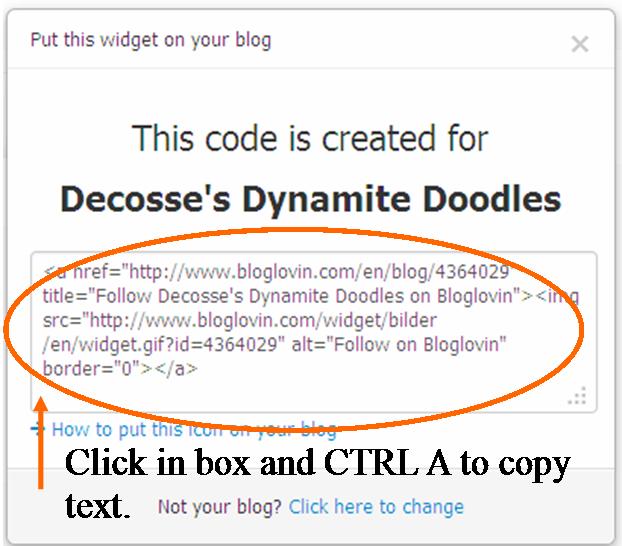
  7. A box will come up giving you the code you need.
  8. Go back over to Blogger and choose 'Layout'. 
  9. Click on 'Add Gadget' wherever you want to put the button.  Remember you can always drag and drop later to move it around.
  10. In the 'Add a Gadget' window options, scroll down and choose, HTML/JavaScript Add
  11. This will pull up the area that you will plug your code into.
  12. You can put in a title if you want to but you don't have to.
  13. Now go back to Bloglovin' where you have the box pulled up that says 'This code is created for <<<your blog name>>>'

  14. Click anywhere in the box and hit 'ctrl A' to copy it all.
  15. Now go back to Blogger where you have your html box up, click in that empty space and paste.
  16. Click save.Rearrange the button where you want it on your layout page and remember to click on 'save arrangement' before leaving this page.
The same instructions work for adding counter or artist icon widgets.

If you are unclear with any of these steps, just let me know. Good luck!

Until next time,

Saturday, June 29, 2013

Promotional Post: New Releases at San's Designs

Hello everyone.  As I mentioned yesterday, San is releasing another set of images today over at San's Designs.

Yesterday I showed you the 'Sweetheart' image and a card I created to show off this fabulous new image.
SN00183 - Sweetheart

Well today I have a few more to show you, so sit back and relax and check out the latest goodies making their way into the store today.


SN00178 -ms Tails
SN00179 - loopy tag

SN00187 - Sunset Tulips
SN00186 - Summer Fairy
SN00192 - Summer charms


So many wonderful new images for me to play with!  I'm sure a few of you have picked out one or two that you'd like to get a hold of yourself!  Now is the the perfect time to add one or more of these awesome new images to your digital collection because San will be offering up a generous discount (until midnight CET) to help entice you.  So, please head on over to the main blog for further details.  Pssst...you will also want to want to pay San a visit to check out the fabulous new freebie up for grabs.

Your place to go for amazing digital designs and card inspiration!


Note: I apologize if there are any formatting issues.  This is a scheduled post and we all know Blogger has a mind of it's own.  If it turns out that something looks wonky, i.e.--part of the sentence is a different size, font, or colour than the rest, I'll fix it as soon as I'm able to.


Friday, June 28, 2013

Card Design: San's Design New Release Preview Two

 
Hello Everyone!  It is almost time for the second part of the June new releases which will be coming out tomorrow over at Sans Design.

This time I have worked with a wonderful new image of a young girl.  I don't often work with strictly people.  I've done people with poses or something else going on in the image but I don't know that I have ever just done a profile kind of pic; so, it was time I branch out and try it.  I'm so glad I did.

Here is the watermark of the image I used.  You will be able to get your hands on it Saturday...

SN00183 - Sweetheart
Here are the card and details.  I hope that I haven't forgotten anything...

 FRONT

 Digital Images:
  • Sweetheart:  I coloured this image mostly with Copics using E000, E00, E02 & R20 for her skin; E31, E33, E39 for her hair; and, B93 for her eyes, barrette and shading on Sweetheart's top.  
  • The actual top she is wearing was paper pieced using the Bloom Kit designed by Rachel Dickson from ComputerScrapbook.com.  The background paper is the same as the one I used for the top.  The frame around this young maiden and the buttons are also from this same Bloom kit.  I fussy cut the buttons out and added some cross stitch thread to give them a bit of dimension.

INSIDE

 Digital Images:
  • The background paper used on the inside and the buttons are, of course, from the Bloom kit as well.  
Digital Sentiment:
  • I thought that this was the perfect sentiment for the expression on the young girl's face.  The sentiment is another great freebie I picked up over at Create With TLC.  Click HERE to go to Paulette's blog and HERE to go to the store. 

OVERALL 

Paper Products:
  • Card base: Michael's Recollection's Cardstock, white.
  • Designer Paper:  Both the strip of blue on the front and used as a shadow inside, along with the strip of multi-colour flecked white are both Michael's open stock scrapbook paper.  I used a punch to achieve the edging effect on the white one. 
Challenges I hope to enter include:
Some more challenges may be added to this list later this week and/or month.

I am so glad you have had the chance to stop by and check out my latest creation.  Don't forget to stop by tomorrow when I will present the remaining new releases.

Your place to go for amazing digital designs and card inspiration!


Thursday, June 27, 2013

Bit by the Bug Beginnings: Another Bug is Born


You are going to want to go and visit Creative Bug on the Loose today because a new Bug has been born.  Naomi is sharing with the world her newest release:

Bringing Balloons


This week I'd like you to meet Bryce.  

To learn about who he is and also find out how you could win a copy of this cool dude make sure you head on over to Creative Bug on the Loose and follow the directions that have been laid out.  Entering to win is easy peasy.  You don’t want to miss out on this exciting opportunity.


I've caught the Bug,

have you?


Until next time,

Note: I apologize if there are any formatting issues.  This is a scheduled post and we all know Blogger has a mind of it's own.  If it turns out that something looks wonky, i.e.--part of the sentence a different size or font than the rest, I'll fix it as soon as I'm able to.

Bloglovin' Mini Tutorial for Claiming Your Blog

I am sorry it has taken me so long to get this posted.  I've now had a few people ask me to help them out with getting set up over on Bloglovin'; so, I figured that since I've already created a tutorial of sorts, I might as well share it with all of you.  We've been told that Google Friends Connect will be sticking around and that it is only Google Reader that will disappear as of July 1st but I guess we'll just have to wait and see what happens.

For those of you who have already set yourselves up, that is wonderful, but for those of you who haven't and are wondering how, then this post is for you.  These instructions are meant for those of you who have joined Bloglovin' already.  If you are having problems joining, let me know and I'll guide you through that process as well.  

In order to claim your blog, you will need to have a few windows open in your Internet program and go back and forth between Blogger and Bloglovin'.  A good time to claim your blog is when you already have to create a post.  If you are not scheduled to create one, you will need to just go ahead and create one for the purpose of claiming your blog.  I hope that the instructions are clear and concise.  If you have any problems following them, please do not hesitate to ask for assistance.  Please note that I did create the majority of this tutorial a couple months ago and have had to tweak it a bit because Bloglovin' changed their setup a bit.  I hope that as a result of those changes, I haven't missed anything.  Good luck!
  1. Go to Bloglovin'.  Click HERE for a shortcut to get there.
  2. When you get to Bloglovin' sign in.
  3. Hover your mouse over the white heart contained within the blue box.  Update:  If you have already signed up with Bloglovin' and inserted a picture, the white heart contained within the blue box will no longer be there and it will be your picture that you would click on.
  4. Scroll down and click on 'my blog'.
  5. You will see a blue button that says 'claim blog'.  Click it.
  6. A search box will come up.
  7. Type the name of your blog into the search box.  Click search.
  8. Your blog's name will appear in this box.  Click on the title.
  9. A new box will come up that says 'claim blog' and it will have some HTML code that you will need to enter over on your blog in a new post.
  10. Leave this there and open a window to bring up blogger (if you don't already have it open).
  11. Click to create a new post.  It doesn't matter what it is about.  It could simply be letting everyone know that you are now set up on Bloglovin'.
  12. Now switch back to the window that has the box with the code you will need.  Put your cursor in the box and hit ctrl A to copy all the code.
  13. Go back to your blog.
  14. Now notice how you can switch between Compose & HTML see image below--left hand side
  15. Inline images 1
  16. Click HTML and then paste the code at the top of the post.
  17. Switch back to Compose and you will see, the words, "Follow my blog with Bloglovin".  Finish up your post like you normally would. 
  18. When you publish your post it will say 'Follow my blog with Bloglovin' at the top of your post.
  19. Go back to Bloglovin' and click the button "claim blog" to say you've completed it.  
  20. That should be it.  You can sign out of Bloglovin' at this point.
If you are unclear with any of these steps, just let me know.  If there is interest I'll also create tutorial's for adding the 'Follow Me on Bloglovin' buttons to your sidebar.

Until next time,


Wednesday, June 26, 2013

Wonderful Wednesdays: Winsome Words to Finish June Kit

If you are new to my blog and would like to know how Wonderful Wednesdays got started, please click HERE.

It is time for the final offering for the June kit--some winsome words.

First up we have some words in the form of a paper.  I've done one in beige and black and the other in black and blue.


Both are the same size, 3600 x 3600 pixels wide in jpg format.  Just make sure you bring them up in the lightbox to save them.

Other graduation related words include:


Again, all matching words are the same size and much larger than they appear here.  I've offered them in both black and the blue that makes its way through the rest of the items in the June kit.  You can easily reduce the size of the image without distorting it.  The tassel I used in the last set of word art is based on a template from Pixel Scrapper.

Hope you like my final offerings for this month's kit and can find some use for them.  If you missed the first items you can go HERE.  To find items from previous kits look for Wonderful Wednesdays or look under the individual names of the month, i.e. January Kit in the label section.  If you create a project using one of these images or any of the images I create, I'd love to see them and post them into the 'Your Gallery' portion of the blog.

Next month brings with it a whole new theme so stay tuned.

Until next time,


Follow on Bloglovin

Font information:
Click on the font name to go to a download location.  Both these fonts are free for commercial use.
 
Image information: 
  • You are allowed to use the images on handmade projects that you intend to sell.  Just be sure to familiarize yourself with my terms of use found in the copyright tab at the top of this page.  I have included a quick summary below.  The tassel element and paper was created using a template from Pixel Scraper.    
Quick summary of Terms of Use:    
  • Do not claim the image as your own.
  • Credit 'Decosse's Dynamite Doodles' somewhere on your creation.
  • Do not share my images with family, friends, etc.  Additionally, do not post any images to file sharing services like Box®, 4-Shared®, etc.  Instead, please direct people to my blog so they can grab the image for themselves.
  • If I have signed an image, do not delete my signature.
  • Leave a comment on my blog.  It is currently the only way for me to know if any of my freebies are being nabbed.  Additionally, it will help to inspire me to continue to create and offer future freebies.
Bonus:
If you've actually made it to the end of this post I have a little bonus item for the June kit.  It is a date stamp in a darker blue that should complement other offerings in the June kit.  Enjoy!


Monday, June 24, 2013

Motivational Monday; Finding the Inner Strength to be Kind to Ourselves

 If you are new to my blog and would like to know why 
I started Motivational Mondays, please go HERE.


While visiting an entrant into the Path of Positivity Challenge last week, I was inspired to create this post.  As some of you may know, the theme this month is STRENGTH.  There are many different forms of strength and Donna chose to talk about the inner strength achieved from being kind to ourselves.  You can click HERE to read that post.

Donna is offering some candy and to qualify to be entered into the draw which is on until the first of July, she is asking people to comment on the quote "to thine own self be kind".  She believes that it is true inner strength that helps us to be kind to ourselves and then goes on to discuss the kindnesses that she is working on to strengthen her own soul.  Part of the comment I left her is the basis for this discussion.

There are so many times in our lives where we forget to draw on the inner strength reserves within us.  Even when we are holding on by a thread, if we dig just a bit deeper we should be able to connect with something that helps us to climb back up and continue.

Finding the strength to be kind to ourselves is no different.  There have often been times when I have been less than kind with my own internal dialogue.  In fact, it still happens once in awhile.  Most everyone does it, at least occasionally.  However, it is how we react to that negative self-talk that matters.  Do we let the internal dialogue continue its bashing or do we have the strength to stop it in its tracks and counteract the negative statements with positive ones? 

Inner strength takes on many forms.  Being kind to ourselves is just one of them. 


I found a really great quote that summarizes this...


As always, the quotes are much larger than appear but can easily be reduced in size without distorting the image.  I need to make them rather large because for some reason when they are imported into programs like Word or Publisher they end up rather small and then it becomes difficult to enlarge them without affecting the quality of the image.  Both quotes are in png format at 300 dpi.

Just a reminder that the challenge #3 over on the Path of Positivity Challenge has just one more week to go.  If you haven't already, I'd love for you to add any project and/or post that you have created since June 3rd that symbolizes strength in some manner, to the pathway.  You can enter by clicking HERE.  

As always image details, download instructions and a summary of my terms of use can be found below.

Until next time,


Fonts Used:  
Click the font names to take you to a download location.  All fonts are free for commercial use. 

If you are not sure how to copy the image, check out the download instructions page.   If you haven't already, please become familiar with my terms of use found in the copyright tab at the top of this page.  Quick summary of Terms of Use:  
 
  • Do not claim the image as your own.
  • Credit 'Decosse's Dynamite Doodles' somewhere on your creation.  You may sell handmade creations using one of these sentiments.  Just be sure to become familiar with my full terms of use.
  • Do not share my images with family, friends, etc.  Additionally, do not post any images to file sharing services like Pinterest®, 4-Shared®, etc.  Instead, please direct people to my blog so they can grab the image for themselves.
  • If I have signed an image, do not delete my signature.
  • Leave a comment on my blog.  It is currently the only way for me to know if any of my freebies are being nabbed.  Additionally, it will help to inspire me to continue to create and offer future freebies.
 

Card Design: Digi Darla's Challenges #68--At the Beach

Hey guys!  I hope you all had a fabulous weekend.  It is Monday morning over here in my corner of the world and that means it is time to show you my latest creation for this week's challenge over at the distinguished Digi Darla's Challenges Blog. This week for Challenge #68 the theme is "At the Beach".  We want to see water OR sand somewhere on your project.  With the summer approaching quicky, it is the perfect time to be creating cards with these features.

Don't forget one person will be the lucky winner of FIVE Digi Darla (DD) images!  AND any entries using a DD image get entered into a SECOND drawing for THREE images. So, you could technically win eight images!  If you do use one of Kim's wonderful images make sure you let us know by writing DD after your name when you enter.

I've used the following Digi Darla's digis in my project this week:


Here are the card and details, I hope I haven't forgotten anything...

General Information:
  • Let me start of by saying this.  This card is a complete abstract fantasy piece.  I know that the majority of the elements are not the right colour and certainly not shaded properly but this week I just needed some time to unwind and do something silly.  
  • I had started working on the digital design of this before the corruption of computerville and somehow, when I was in the midst of making some backups, I backed up right over it and lost the file.  Knowing all that work had gone to waste, I decided I didn't care that this wasn't going to be a representation of my better work.  I just needed to play around and try working with some new patterns and brushes.
  • That being said, I apologize to Kim, Heather and Faith, if it looks like an eight year old designed this card.
  • I was very lucky that this month the image in the Delightful Inspirations progressive challenge fit in with the theme and thus became the focus for the inside of the card.  Yay!  I managed to create a two-for-one post!  That is a good four hours minimum time I've saved being able to combine these two challenges.  Right now I'll take every second I can get!

FRONT


Digital Images:
  • The four fish used in this design: You can find the fish in the DD store by clicking either the watermark or image name linked above.  As you can see from the watermark, I took the fish and separated them so that I could have them swimming exactly where I wanted them.  You have the option of also purchasing all four fish in the same image if you want.  To purchase the 'Four Fish in the Sea' image click HERE.
  • I've also added a crab and underwater sea bed image from Fresh Brewed Designs.  Clicking on either watermark will take you to their spot in the store.

  • Okay, so here we go.  First up, I'm going to show you a copy of the digital creation.  I put so much time into doing the fish scales and shading, and once again it is so much smaller when printed that you can't really see the effects.  Thus, I figured I'd show you the original creation before I resized and printed it.  If you click on the image to bring it up in the lightbox, you'll be able to see the detail so much better.


  • Okay, there are a number of credits that I need to include here:
    • Sea was created using a water pattern from Webtreats
    • First I duplicated each fish.  The bottom layers of the golden fish (top left) and the green fish (middle) were coloured and then I used a pattern from BrixStock to create the scales on the top layer.   I found it interesting that when I added the scale pattern, at a 69% opacity, that the colour underneath changed.  For example, would you believe that the original colour in behind the top and side fins of the golden fish actually are a deep golden colour but for some reason they turned grey.  I'll definitely have to experiment with that.  It seemed that all the darker colours take on a greyish look but the lighter colours retain a semblance of their original hue.  Things that make you say hmmm....
    • For the grey and burgandyish fish I used a brush from an artist named Tijo who is with Brusheezy
    • The rest of the effects were achieved by using a number of different filters in Photoshop Essentials 5.
Embellishments:
  • The blue sparkly ribbon is Celebrate It brand purple label from Michael's.

INSIDE


Digital Image:
  • Sea Turtle Beach Digital Stamp Set:  As I mentioned in my general information section, I was lucky enough this month to be able to combine my Delightful Inspirations progressive stamp of the month challenge with this week's Digi Darla's Challenges theme.  In order to enter the DI progressive challenge, you must either have received the latest image by having participated in the previous month or you can buy the stamp for the current month's challenge.  Everyone who enters and follows the rules is a winner because you automatically get the stamp for the next month's challenge and what amazing stamps they are.  Stop by the site and check out the rules for yourself.  While you are there, have a look around.  They have some really great images.  You can find this set in the store by clicking on the watermark below.

  • The sea turtle beach image was also coloured digitally.  Once again I've included a copy of the digital creation in case you want to check out any of the details closer.


  • There are a couple credits that I need to include for the inside:
      • Water was added using the same pattern from Webtreats
      • For the sky I used different colours and brushes from a set by Leboef.
      • The rest of the effects were achieved by using a number of different filters in Photoshop Essentials 5.
Digital Sentiment:
  • This sentiment is the perfect accompaniment and is available from Fresh Brewed Designs and you can find it in the store by clicking on the watermark below.

OVERALL 
Paper Products:
  • Card base: Michael's Recollection's Cardstock, white. 
  • Designer Paper:  
    • The lined paper (front & inside) is from Ki Memories Inc., Fancy Free paper pad.  This was actually the very first scrapbook paper pad that I bought.
    • The royal blue cardstock used as a shadow and for the little triangles on the inside is from Michael's open stock scrapbook paper.  
Challenges I hope to enter include:
Some more challenges may be added to this list later this week and/or month.

So, why not come and show us what you've got by entering in our current challenge this week over at Digi Darla's Challenges?  While you are there please check out the wonderful creations from the rest of the design teamWe always look forward to seeing the delightful creations you come up with.


Thank you so much for stopping by.  As I've now added to my comment section, whether you are a regular, here for the first time or popping over in your official capacity as a DT member, please know how much I appreciate the words that you leave behind.  Your encouragement helps me to become a better designer.   I try my best to reply to your comments (when an email address is available) but that is getting more and more difficult as my plate fills up with new responsibilities, new roles, and new obligations.  If I don't get the opportunity to thank you personally, know that I don't take a single comment for granted. Thank you for your understanding.

Until next time,


Note: I apologize if there are any formatting issues with the above text.  This is a scheduled post and we all know Blogger has a mind of it's own.  If it turns out that something looks wonky, i.e.--part of the sentence is a different size, font, or colour than the rest, I'll fix it as soon as I'm able to.